
How to Create WhatsApp Split Links for Automatic Lead Distribution in WADesk
Creating Split Links
Navigation Path: Home → Inbound Lead Generation → Customer Service Split → Create Link
A Split Link is a WhatsApp link. Place it on your ad landing pages, social media profiles, or website, and when a customer clicks it, they are automatically redirected to WhatsApp and assigned to a specific sales account by the system. This lets traffic from multiple channels be automatically distributed across different sales reps—no manual forwarding, and no duplicate reception of the same customer by multiple people.
This article uses the "Contact" mode as an example; for the "Group" mode, see the article "Group Split Links."
📹 Video Tutorial (approx. 5 min) Follow along with the video, or read the illustrated steps below directly.
Quick Start: Create a Link in 2 Minutes
If you don't need to distribute conversations by the customer's region/source/channel, the 4 steps below are enough.
Step 1: Create a New Link
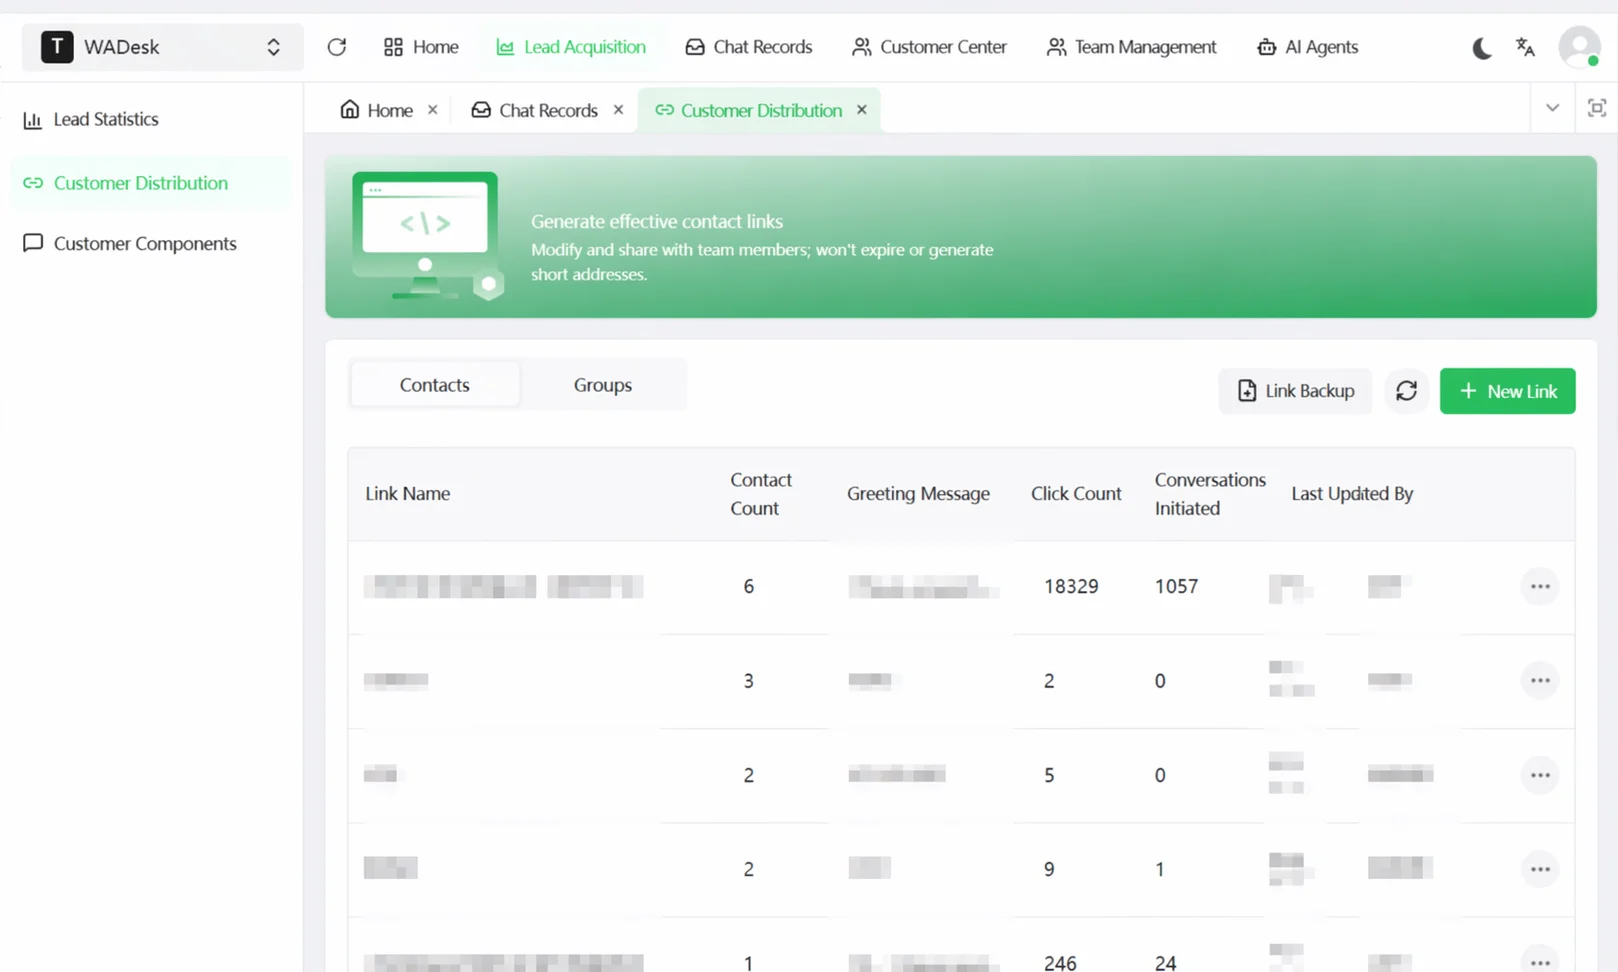
In Home, click Inbound Lead Generation, select Customer Service Split on the left to enter the split link management page, then click the Create Link button in the top right.
Step 2: Configure Split Rules
In the configuration drawer that pops up, check the following items as needed:
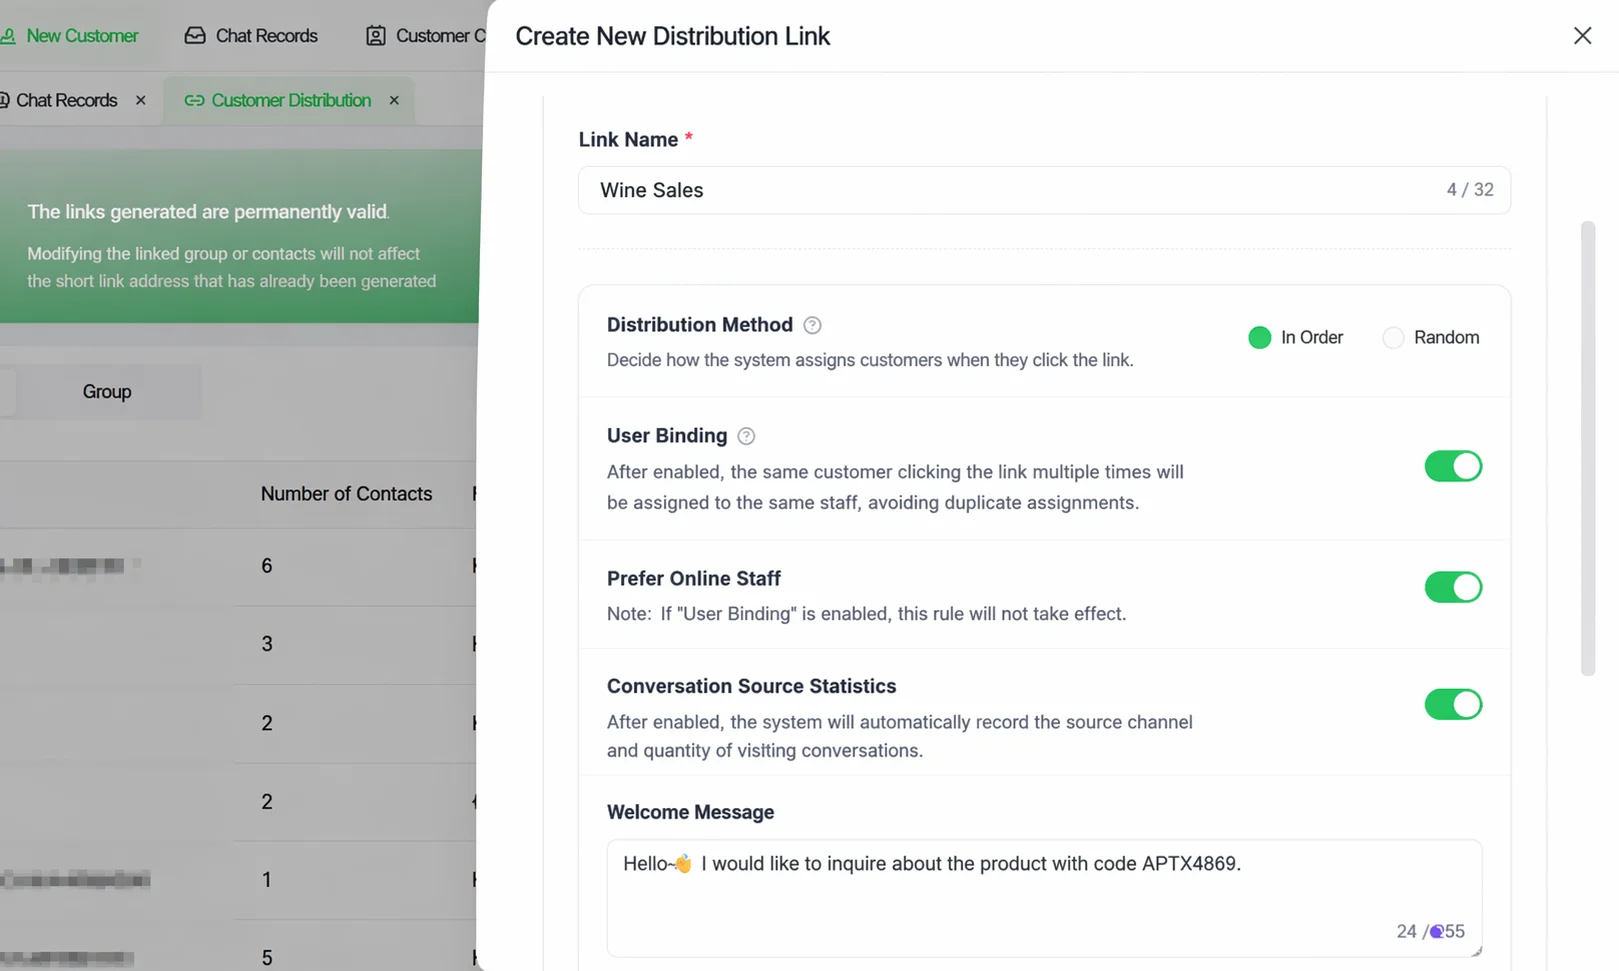
Link Type: Determines what scenario the customer enters after clicking:
- Contact: After clicking, the customer starts a one-on-one private chat with a sales account; the system assigns it to someone according to the rules. Suitable for most sales follow-up scenarios.
- Group: After clicking, the customer joins a designated WhatsApp group directly, with no individual assignment. Suitable for community operations, event recruitment, etc.
Link Name: Give it a recognizable name. We recommend including the channel, e.g., "Website-Homepage" or "Facebook-Brand Ad", to distinguish sources in later statistics.
Assignment Method: Determines how traffic is distributed among multiple sales accounts:
- Weighted: Distributed by the ratio you set; higher weight = more customers. Setting all to 1 means equal distribution.
- Random: Completely random, ignoring weights.
User Binding: Controls who a returning customer is assigned to when they click the same link again:
- On: Recognizes the returning customer and continues assigning to the account that served them last—suitable for businesses needing continuous follow-up.
- Off: Re-assigns on every click—suitable for ad-driven, fast-conversion traffic businesses.
Online Priority: Controls whether traffic is given only to currently online accounts:
- On: Skips offline accounts and distributes only among online sales reps. If all are offline, it automatically falls back to weighted distribution.
- Off: Ignores online status; all accounts participate in distribution.
Conversation Source Tracking: Records which channel the customer clicked from:
- On: The system automatically injects a tracking code at the end of the Greeting Message to trace the source channel.
- Off: Source is not tracked, and the "Source Channel" condition in custom rules is also disabled.
Greeting Message: After the customer clicks the link, WhatsApp auto-fills this text as the first message. Note: this greeting is the message the customer sends to our account, not the greeting we send after the conversation is connected.
Step 3: Add Default Assignment Accounts
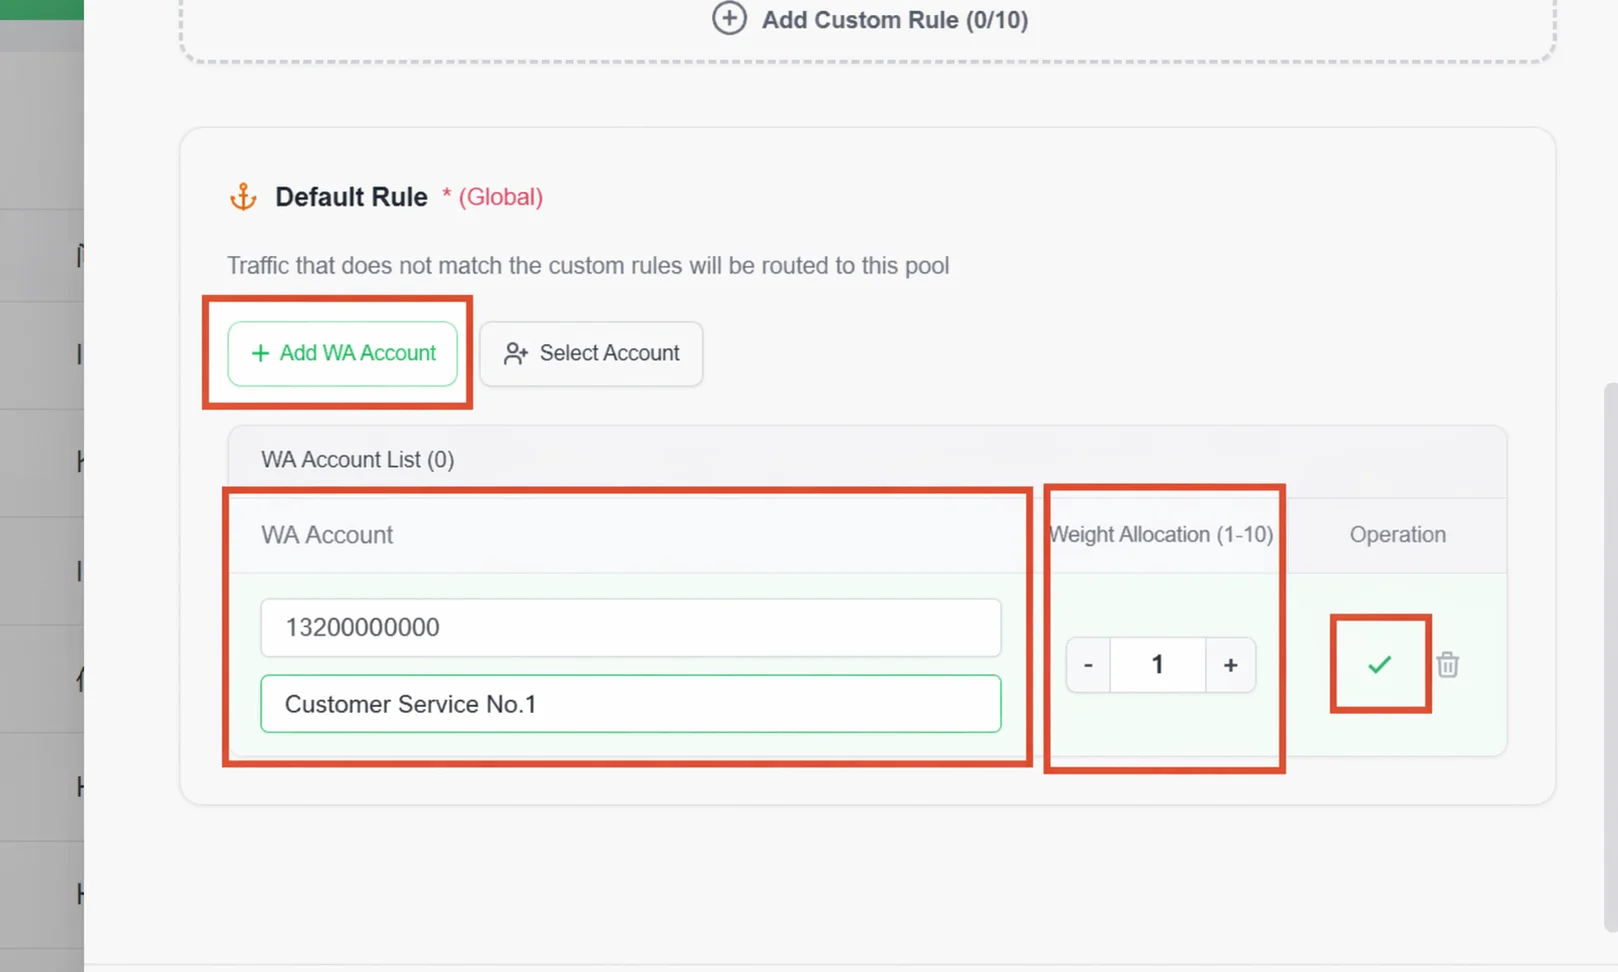
Scroll down to the Default Rule area. There are two ways to add accounts:
- Add WA Account: Manually enter the sales rep's WhatsApp phone number and display name. Click the green check on the right to confirm.
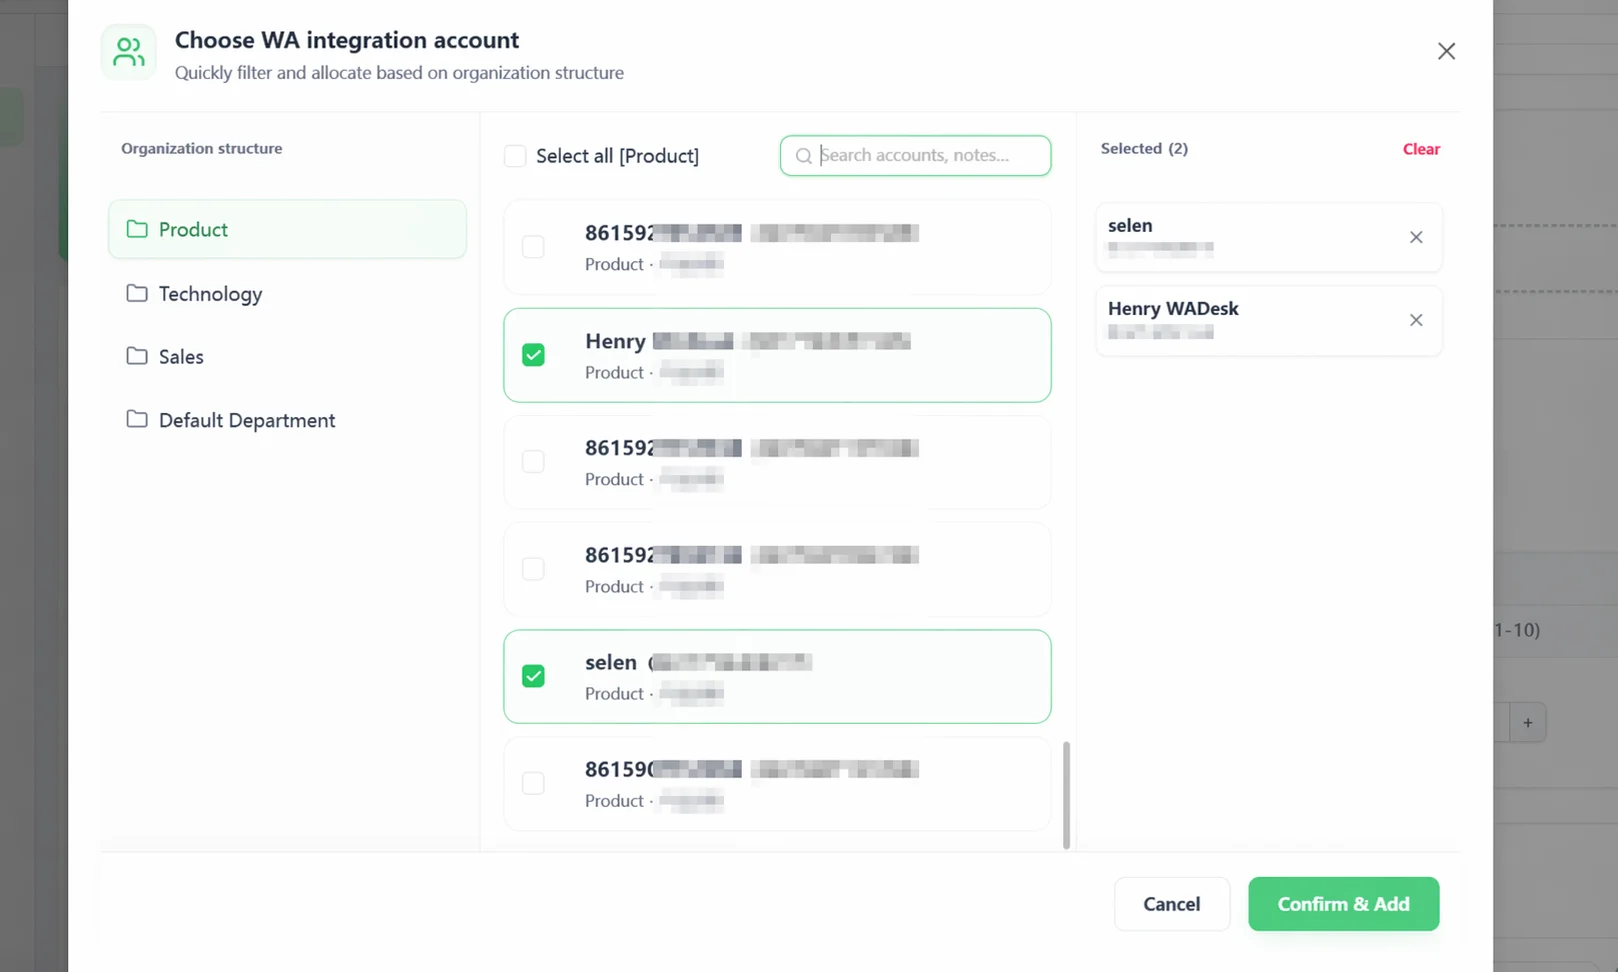
- Select Account: Check accounts directly from your team's organization structure. Search by contact note to quickly locate a member's WhatsApp number; after checking, click Confirm to add.
Step 4: Save and Copy the Link
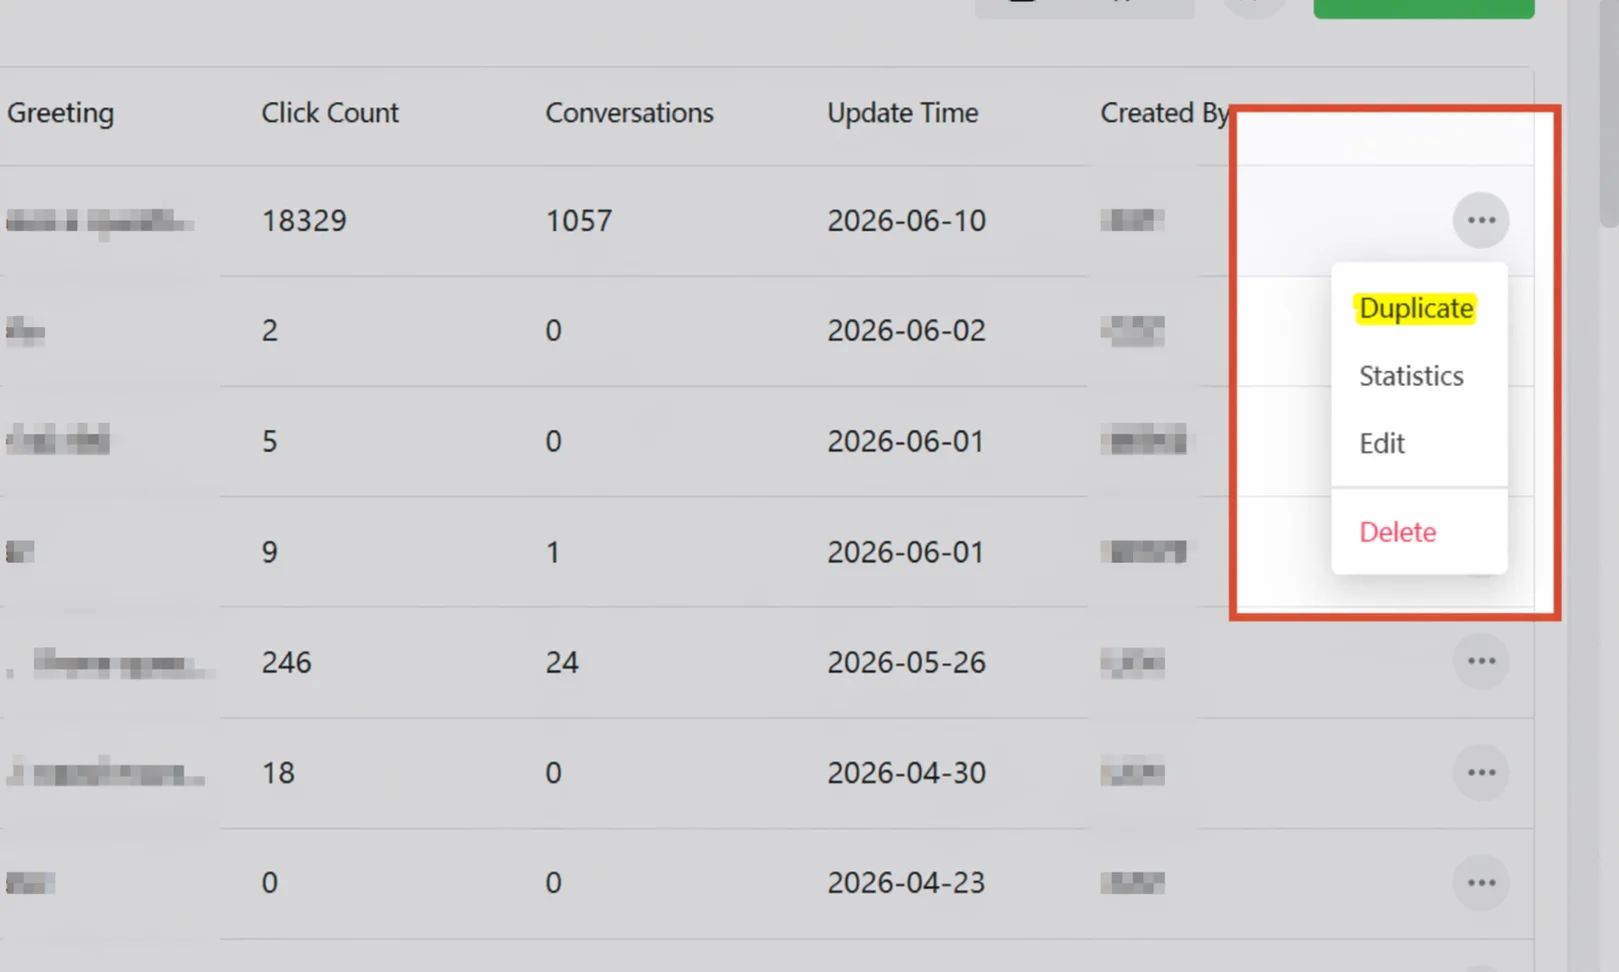
Click Save Configuration in the bottom right. After saving successfully, find the link in the Customer Service Split list, click ··· on the right → Copy Link, and paste the link into your ad or page. You're done.
Advanced Configuration: Read On If You Have More Distribution Needs
Continue with this section if you have any of the following needs:
- Assign customers from different countries/regions to different sales teams
- Handle customers from different channels such as Facebook and TikTok separately
- Keep returning customers assigned to their original sales rep
- Distribute traffic among multiple sales reps by different ratios
Configure Custom Rules: Precise Distribution by Region, Language, or Source Channel
Custom rules let you route different customers to different sales teams based on visitor attributes.
Example: Customers from the US go to the English team; customers from Southeast Asia go to the local-language team.
Click Add Custom Rule, then set the matching conditions and assignment target in the rule card:
| Condition Dimension | Description |
|---|---|
| Visitor Region | Match by country/region; multi-select dropdown |
| Visitor Language | Match by browser language; multi-select dropdown |
| Source Channel | Match by traffic source; requires Conversation Source Tracking to be enabled first |
Within the same dimension, multiple selections use an OR relationship (US or Canada); across dimensions, they use an AND relationship (US and from Facebook).
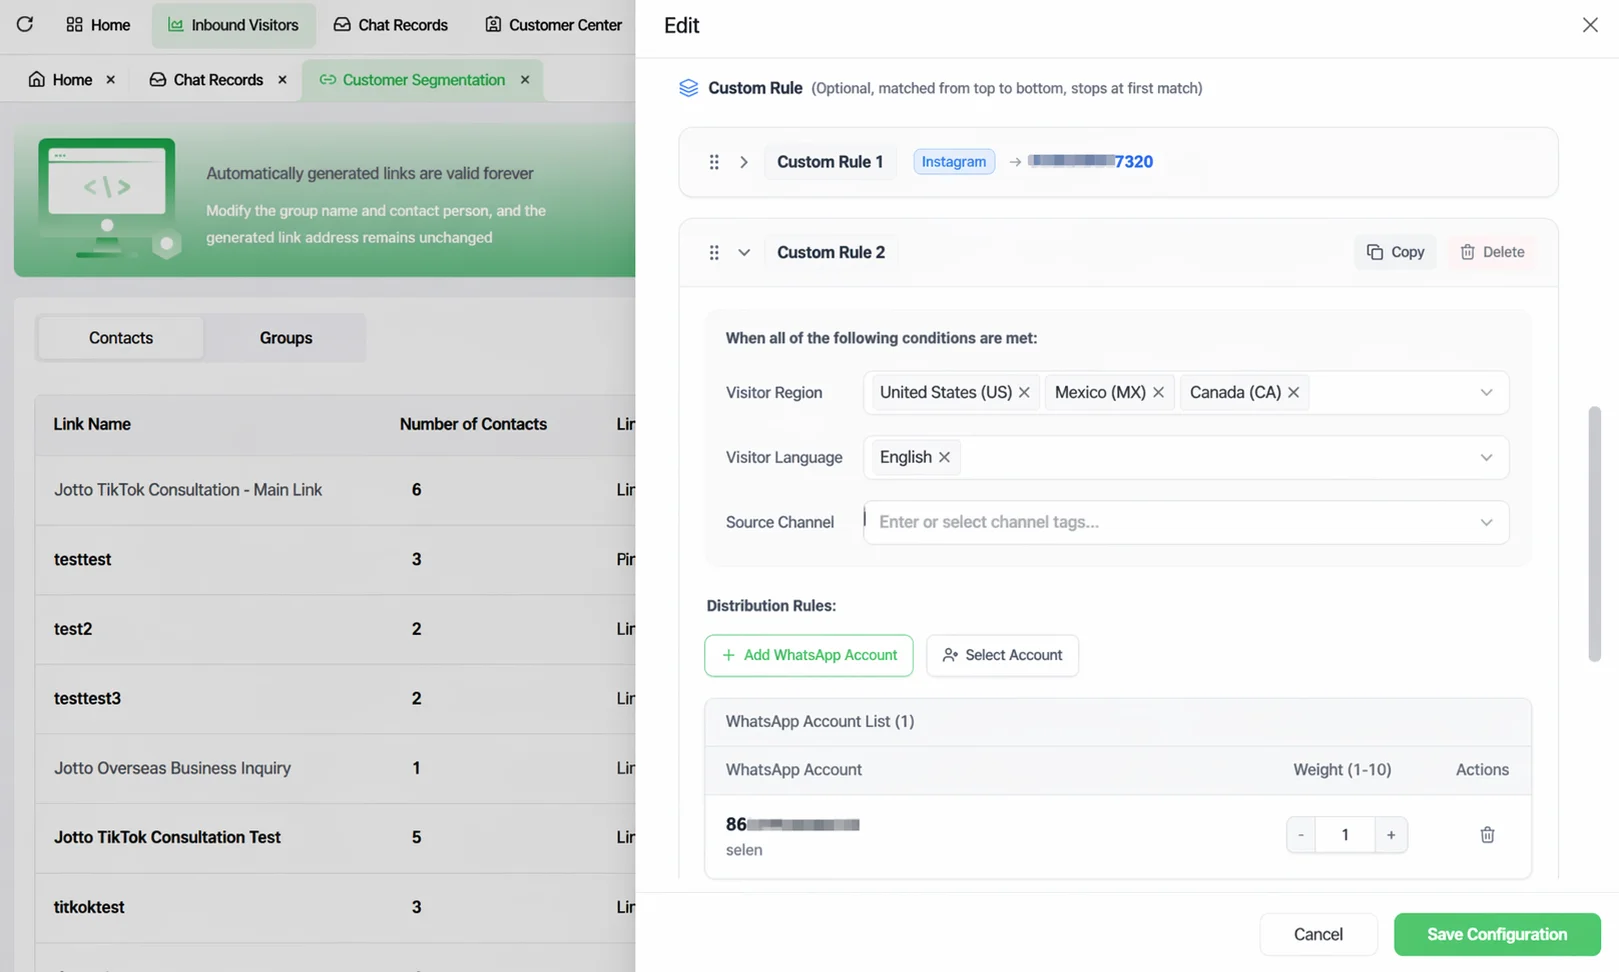
Assignment Target: Click Add Account to select the sales rep to assign to when the rule is hit. You can add multiple and set weights.
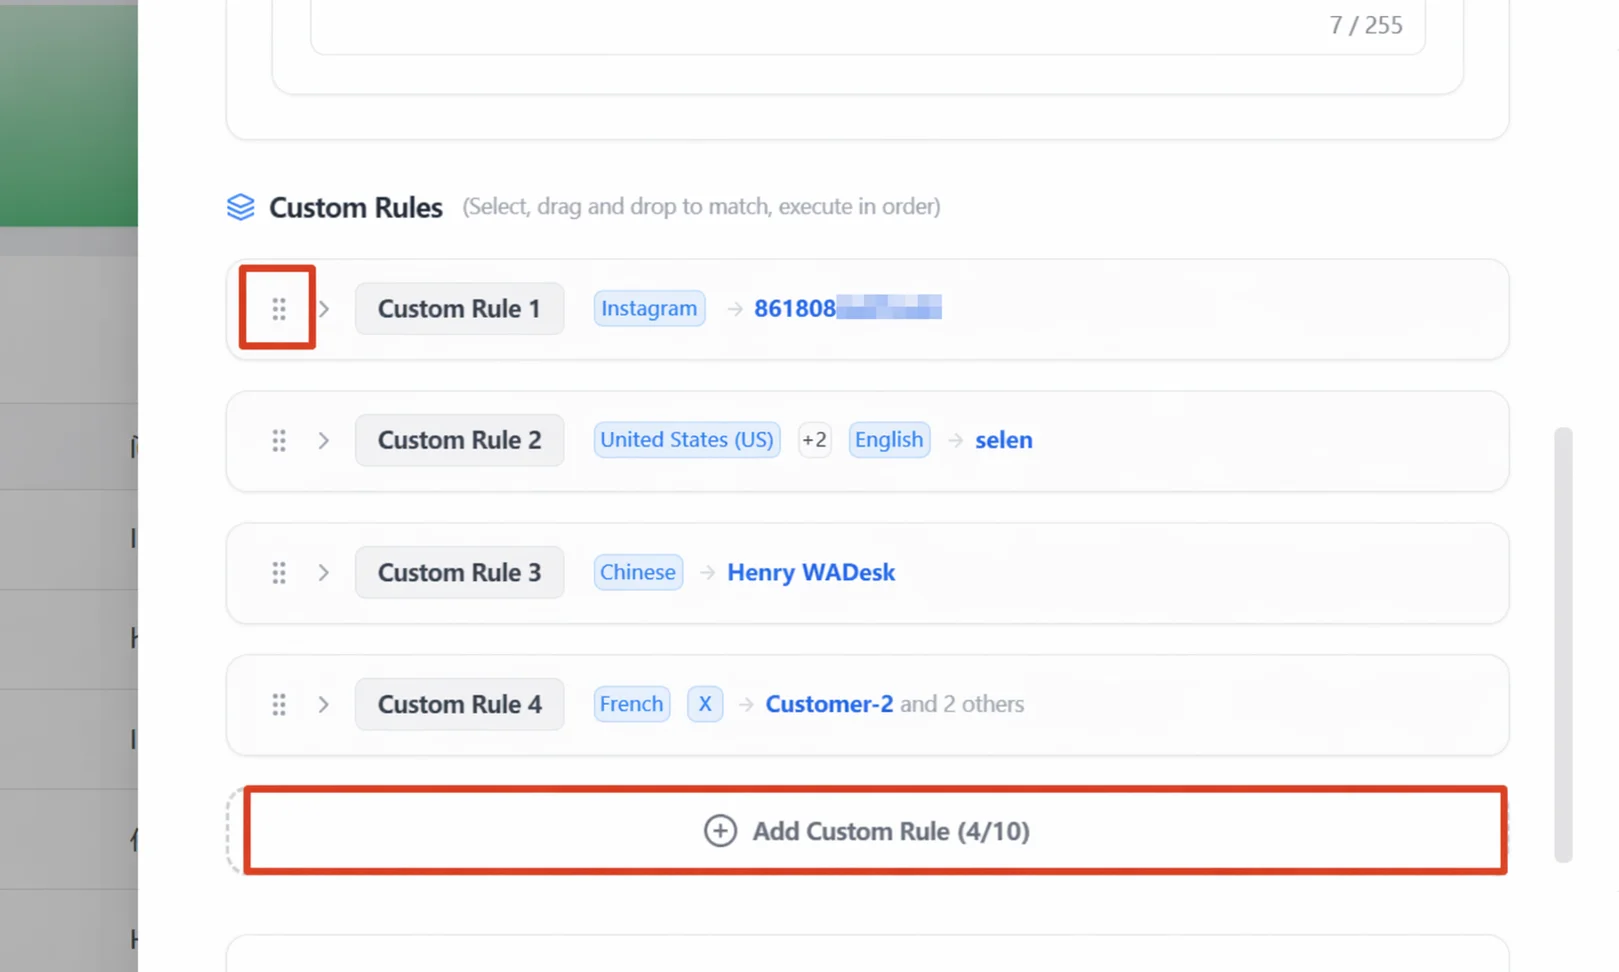
You can add up to 10 custom rules. Rules are matched top to bottom; the first hit stops, and no further rules are checked. Drag the three dots on the left of a rule to reorder—we recommend placing the most specific rules first and the broad ones last, to avoid broad rules intercepting all the traffic.
Set Weights: Control Traffic Ratios Among Multiple Sales Reps
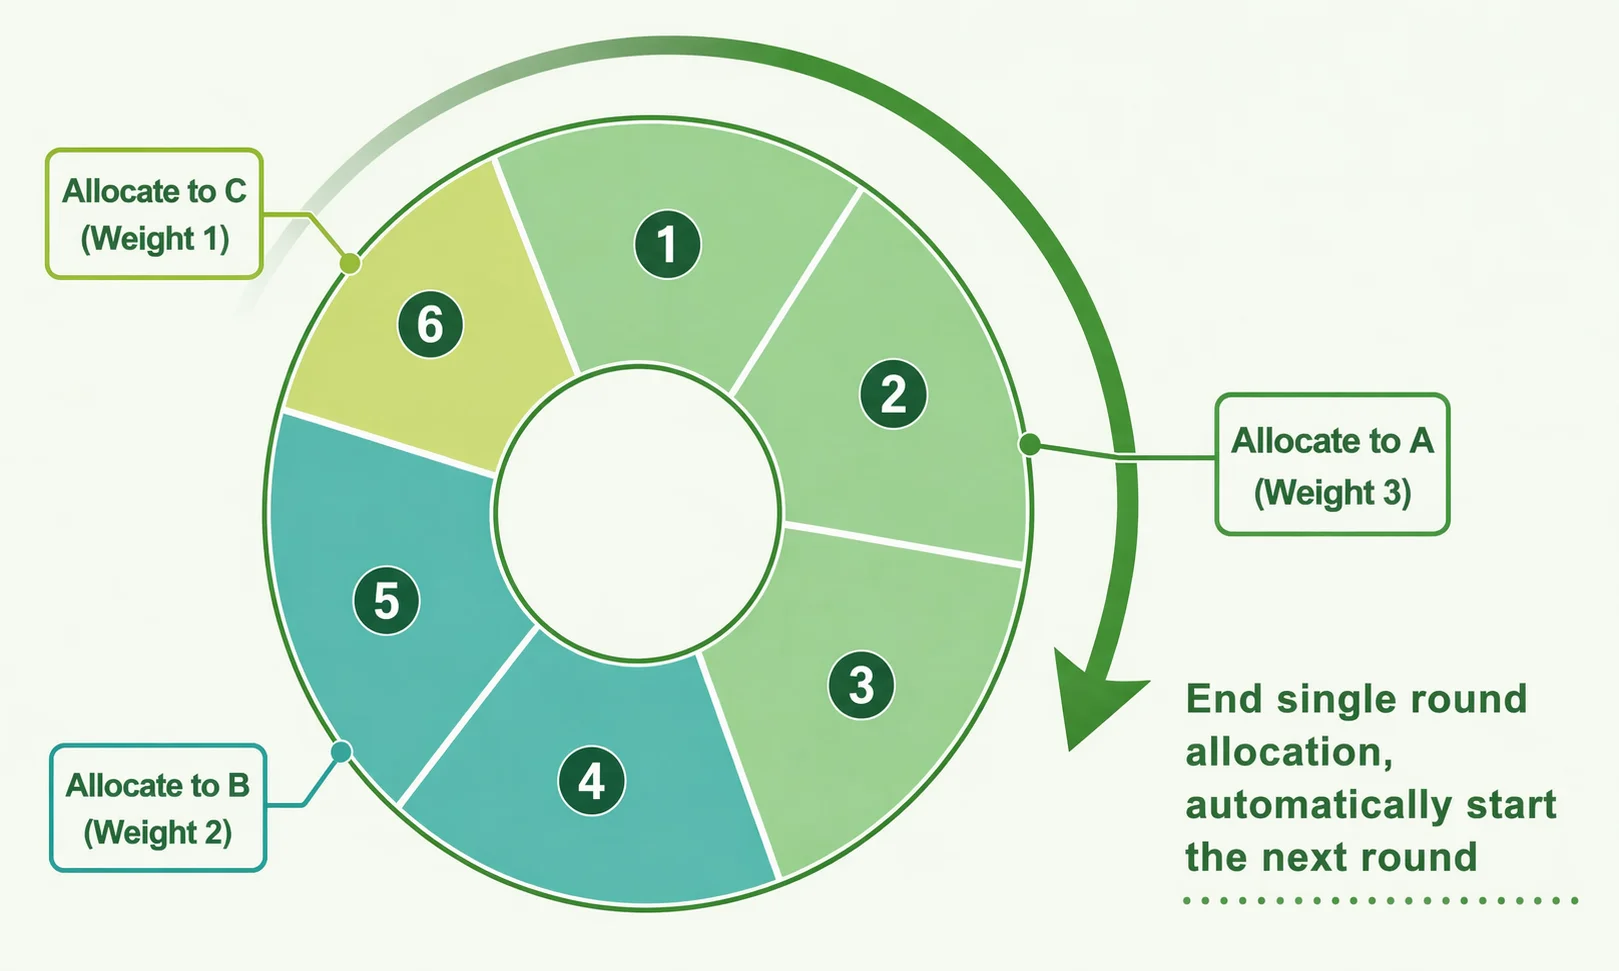
When a rule contains multiple sales accounts, the system distributes traffic by weight ratio. The system sums the weights of all accounts in the current rule pool to form a complete "distribution cycle" and dispatches in order. After one round is complete, a new cycle starts automatically.
💡 Example: Suppose you bind 3 WhatsApp accounts in a rule pool with the following weights:
- Account A: weight 3
- Account B: weight 2
- Account C: weight 1
The actual distribution order will be: the first 3 customers go to A, customers 4–5 go to B, customer 6 goes to C. That is, a single round is: A → A → A → B → B → C.
When the 7th customer clicks the link, the system starts a new cycle, and the overall sequence becomes: AAABBC AAABBC AAABBC AAABBC... (infinite loop).
User Binding: Let Returning Customers Always Find Their Original Sales Rep
With User Binding enabled, when the same visitor clicks the link again, the system recognizes them and assigns them directly to the sales rep who served them last, instead of re-running the assignment rules.
When to enable? Suitable for B2B, high-ticket businesses that need continuous follow-up, to maintain relationship continuity.
When to disable? Suitable for ad-driven, fast-conversion traffic businesses where every click re-assigns for more even traffic.
Note: After User Binding is enabled, even if the bound sales rep is currently offline, the system still assigns the customer to them and will not transfer to someone else. We recommend combining it with Auto Reply to avoid customer messages going unanswered.
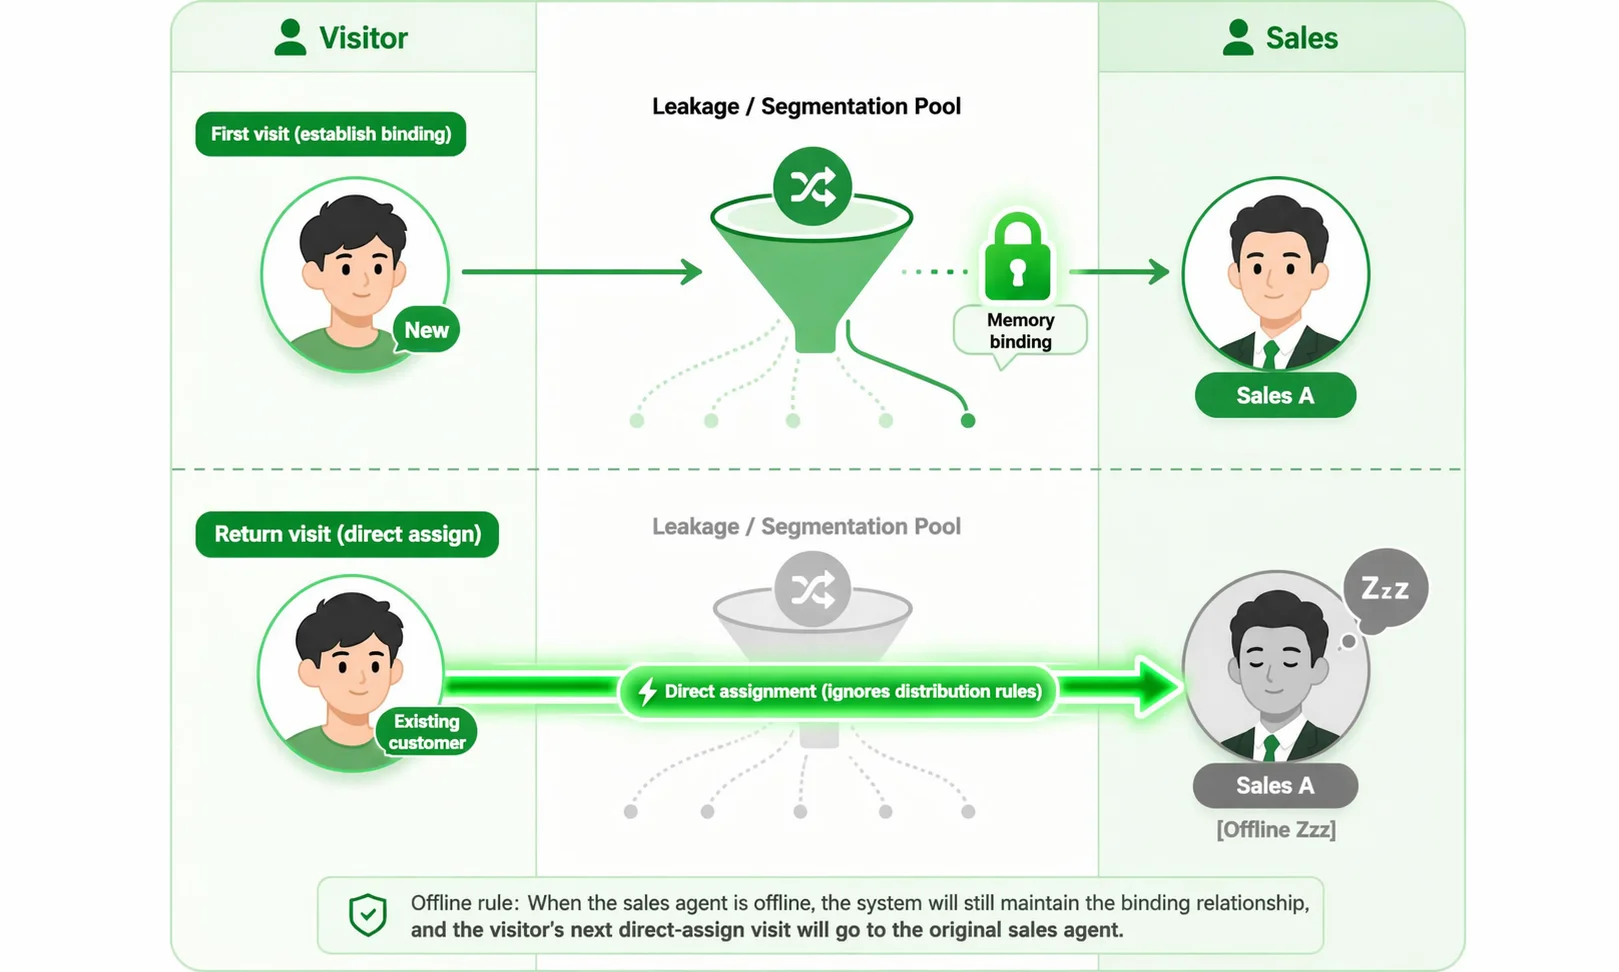
Online Priority: Give Traffic Only to Currently Online Sales Reps
With Online Priority enabled, the system skips offline accounts and distributes traffic only among currently online sales reps.
If everyone in the assignment pool is offline, the system automatically falls back to weighted distribution (including offline accounts), ensuring the visitor is not left unassigned.
Split Logic Overview: How the System Decides Who to Assign
If you have configured multiple rules at once, the system judges in the following order, stopping at the first match:
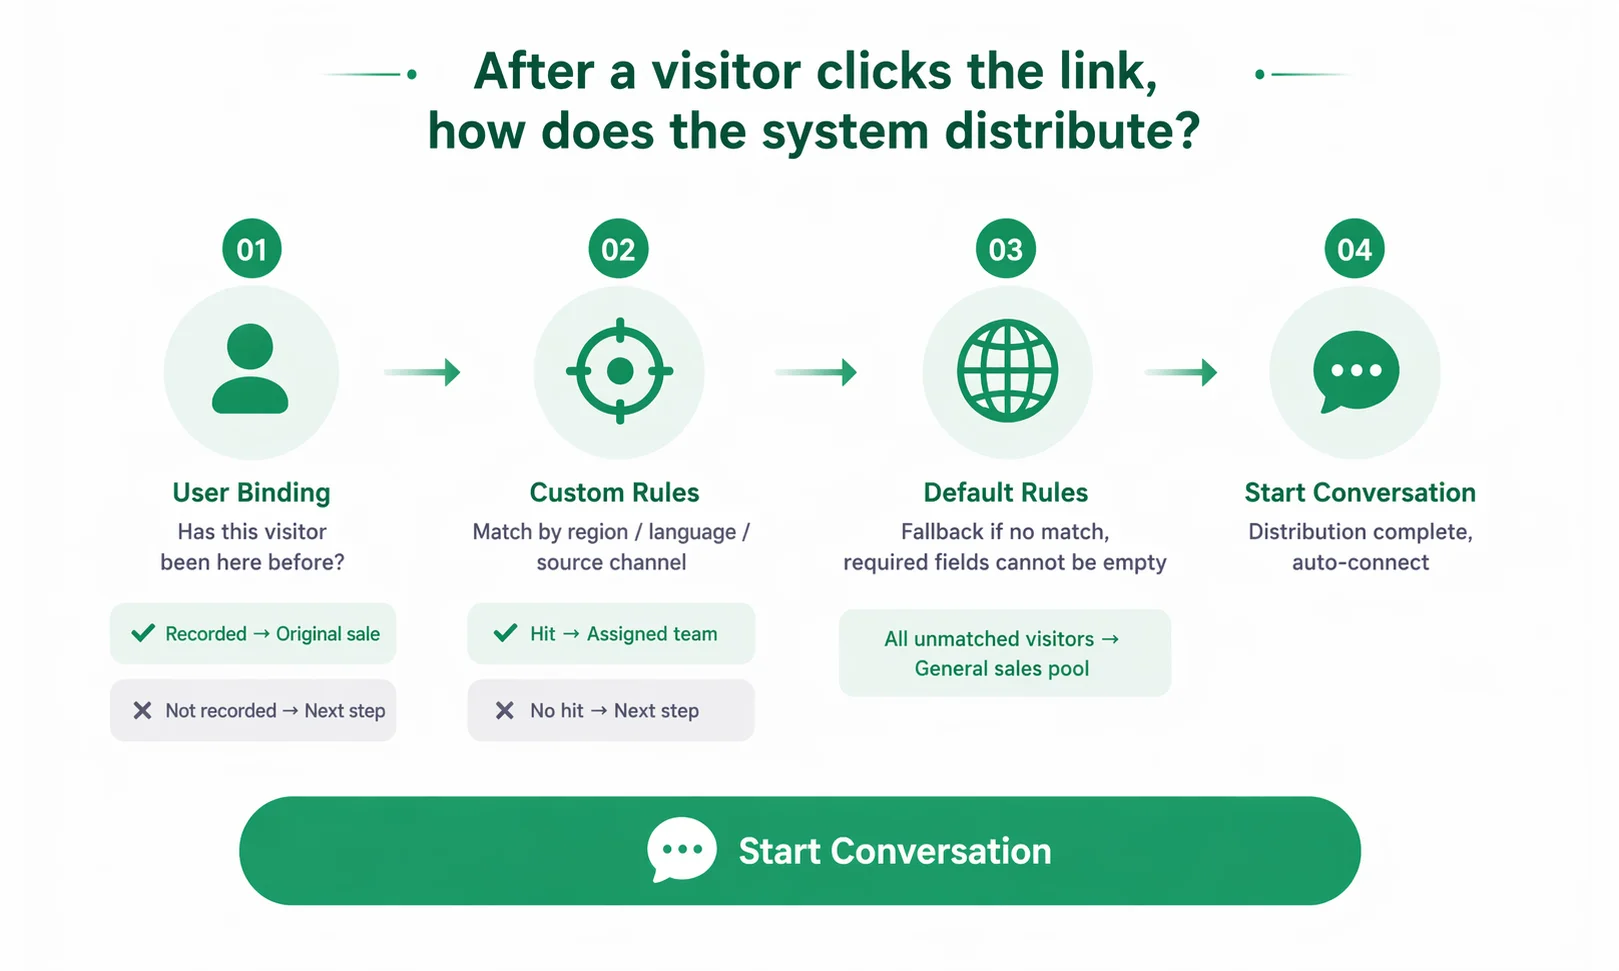
In short: User Binding has the highest priority, followed by Custom Rules (matched one by one in order), and finally the Default Rule as the fallback.
Important Notes
The Default Rule cannot be empty. This is a required field; you cannot save without it. Even with only one sales rep, you must add them to the Default Rule.
The order of Custom Rules matters. The system matches from the first rule and stops at the first hit. If a broad rule is placed first, the more specific rules below may never execute.
FAQ
Q: A customer matches multiple Custom Rules at once. How is it handled? A: The system checks rules one by one from the first. The first match executes and it stops—so a visitor hits only one rule. This is why rule order matters: the more specific the condition, the further forward it should be placed.
Q: If both User Binding and Online Priority are enabled, will a returning customer be assigned to an offline sales rep? A: Yes. User Binding takes priority over Online Priority. The binding relationship of a returning customer is unaffected by online status—even if the bound rep is offline, the system forcibly assigns to them. Online Priority only applies to new visitors with no binding record.
Q: The counts in "Click Records" and "Conversation Records" are different. Is that normal? A: Normal. "Click Records" counts everyone who clicked the link, including those who clicked but sent no message; "Conversation Records" counts only those who actually initiated a conversation in WhatsApp. The difference is traffic drop-off—clicked but didn't message. A larger difference means the greeting or guidance copy needs more optimization.
Q: Source channel conditions aren't taking effect. What's wrong? A: You must first enable the Conversation Source Tracking switch in the basic settings. After turning it off, the source channel conditions configured in custom rules automatically become invalid.