
Complete Guide to Proxy Configuration for WhatsApp Multi-Account Management
Proxy Configuration
Navigation Path:
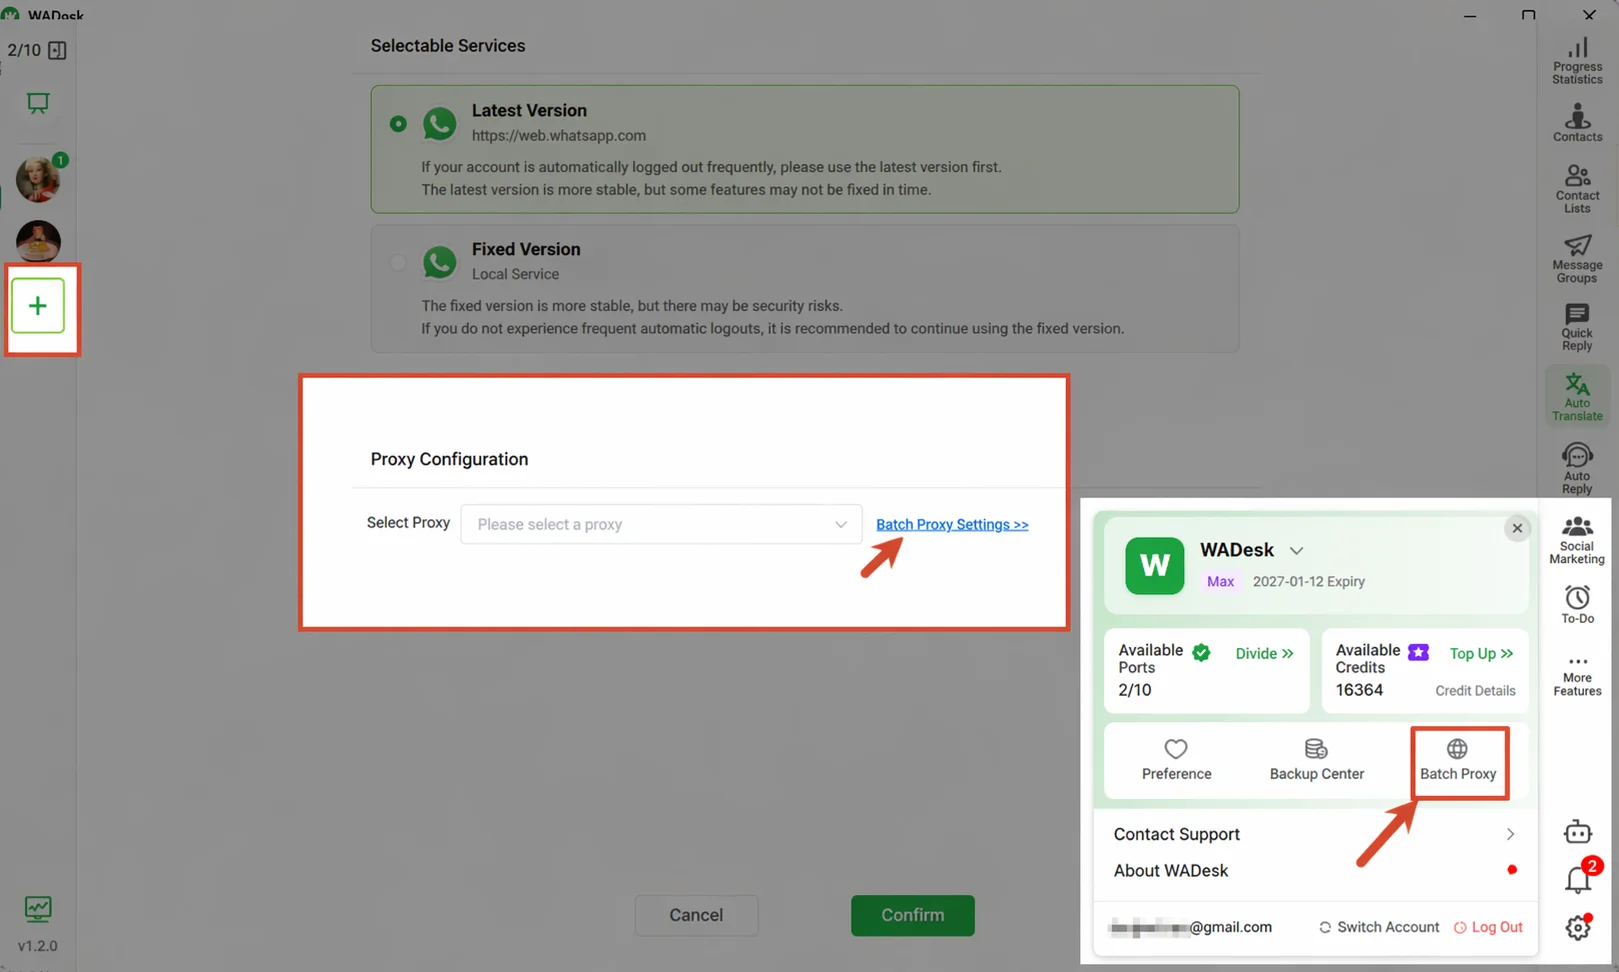
- Desktop Client -> left account panel -> click + to add account -> Proxy Configuration -> Batch Proxy Settings
- Desktop Client -> bottom right Settings -> Batch Proxy Settings
A Proxy assigns an independent network exit IP to each WhatsApp account window, making different accounts appear to come from different network environments. This reduces the risk of WhatsApp identifying multiple accounts on the same device as belonging to the same entity.
What is a Proxy?
A proxy server acts as a "relay station" between your device and WhatsApp's servers. When you configure a Proxy for a WhatsApp account, all network requests from that account pass through the proxy server first. WhatsApp sees the proxy server's IP address instead of your device's real IP.
Why is a proxy needed for multi-account operations? WhatsApp monitors account behavior under the same IP address. If your 10 accounts all send requests from the same IP, the system can easily determine they belong to the same entity and trigger Risk Control. Assigning a unique proxy to each account gives each one a "separate network identity."
What are the differences between proxy protocols?
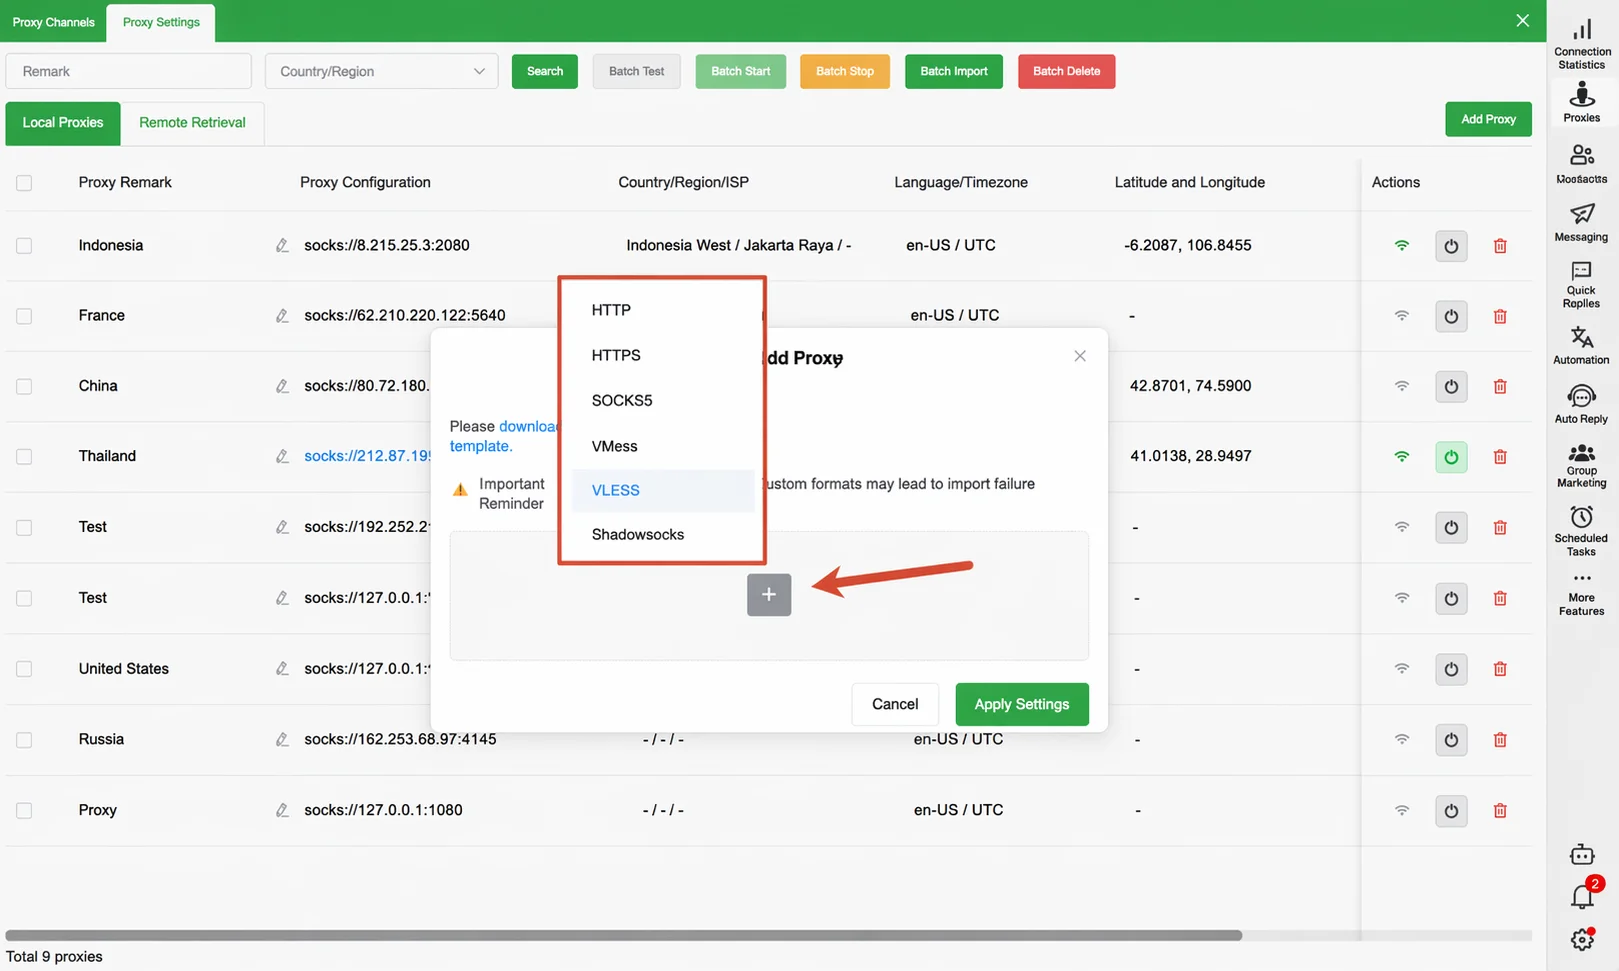
WADesk supports the following five proxy protocols. Refer to the table below when choosing:
| Protocol | Characteristics | Best For |
|---|---|---|
| SOCKS5 | Highly versatile, supports TCP/UDP, fast speed, great compatibility | Most recommended — ideal for residential proxies provided by most proxy services |
| HTTP / HTTPS | Supports HTTP traffic only, simple configuration | Enterprise intranet environments or certain commercial proxies |
| VMess | V2Ray protocol, strong encryption, strong penetration | Advanced users running self-hosted proxy servers |
| Shadowsocks | Lightweight encrypted proxy, strong anti-censorship | Users in regions with restricted network access |
Not sure which to choose? Ask your proxy service provider what protocol they support and fill in the details they provide. Most residential proxy providers default to SOCKS5.
Proxy IP Types
- Residential Proxy: IP from a real home broadband connection — closest to a real user, lowest Risk Control detection rate by WhatsApp. Strongly recommended.
- Data Center Proxy: IP from a cloud server — fast but easily detectable, higher risk.
- Dedicated Proxy vs. Shared Proxy: A dedicated proxy is used only by you, offering higher stability and security. A shared proxy is used by multiple people — lower cost but carries the risk of account bans caused by others' behavior.
What is a "window"?
In WADesk, each logged-in WhatsApp account corresponds to a "window." The binding between a Proxy and a window is one-to-one — one window can only bind one proxy, and one proxy should ideally only be assigned to one window to ensure IP independence.
Configuration Process Overview
Proxy configuration has two phases that must be completed in order:
Phase 1: Register proxy resources (add proxy IP info to the system)
    ↓
Phase 2: Bind a proxy to an account window (let a specific account use that proxy)
If you don't have a proxy when adding a new account, you can skip this step and bind one later through Batch Proxy Settings.
Steps
Step 1: Enter the proxy management entry point
There are two ways to access Proxy configuration:
Method A (when adding a new account): In the Desktop Client, click + in the left account panel to add a new account. At the bottom of the configuration page, find the Proxy Configuration section and click the Batch Proxy Settings >> link on the right.
Method B (for existing accounts, unified management): In the Batch Proxy Settings dialog, switch to the Proxy Settings tab to manage.
Step 2: Add a proxy resource
In the Batch Proxy Settings dialog, click the Proxy Settings tab at the top. Confirm the sub-tab is on Local Create, then click the Add Proxy button. A panel slides out from the right.
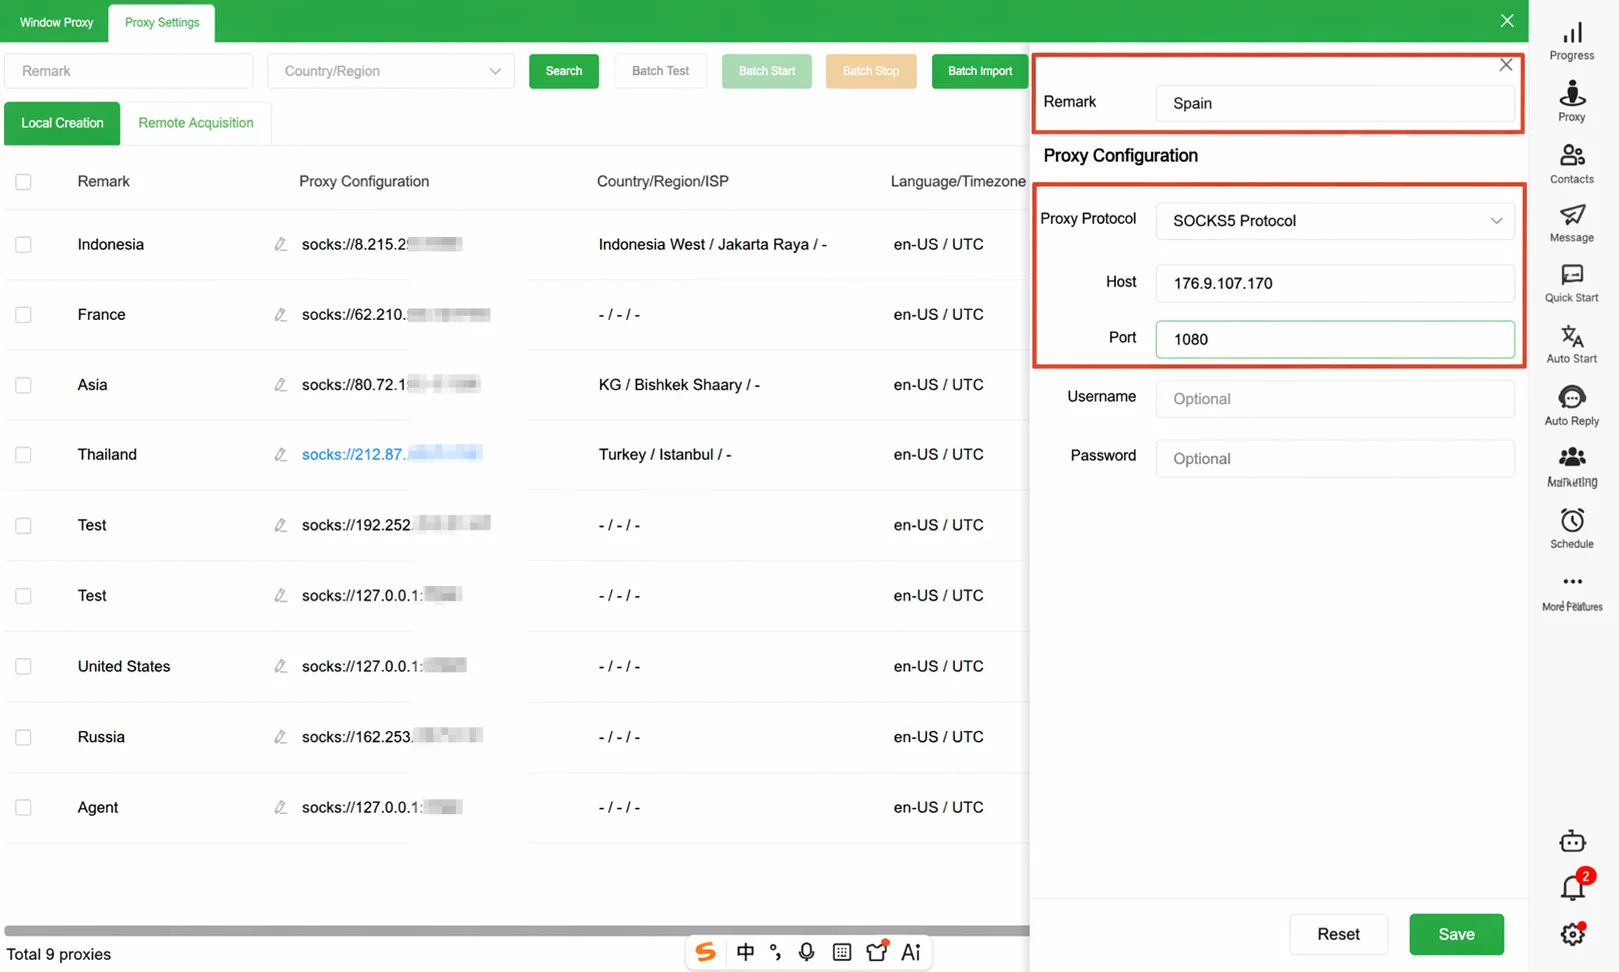
Fill in the following fields in order:
1. Note (required): Give this proxy a recognizable name. Include the country and a number, e.g. "India-Residential-01".
2. Proxy Protocol: Select the protocol type provided by your proxy service from the dropdown (usually SOCKS5).
3. IP Address & Port: Enter the server address and port number provided by your proxy service, e.g.:
- IP:
123.45.67.89 - Port:
1080
4. Username & Password (if applicable): Some proxies require authentication. Fill in based on your provider's details; leave blank if no authentication is required.
After filling in the details, click Save. The proxy information is registered. The system automatically parses environment fingerprints such as country/region, language, time zone, and coordinates, which are displayed in the list.
Batch Import Proxies (optional, for large quantities)
If you have many proxies to register, use the batch import feature to avoid adding them one by one manually. Click the Batch Import button, fill in all proxy information in the template Excel file, and upload it. The system parses and registers all entries at once.
Step 4: Check if the proxy is usable
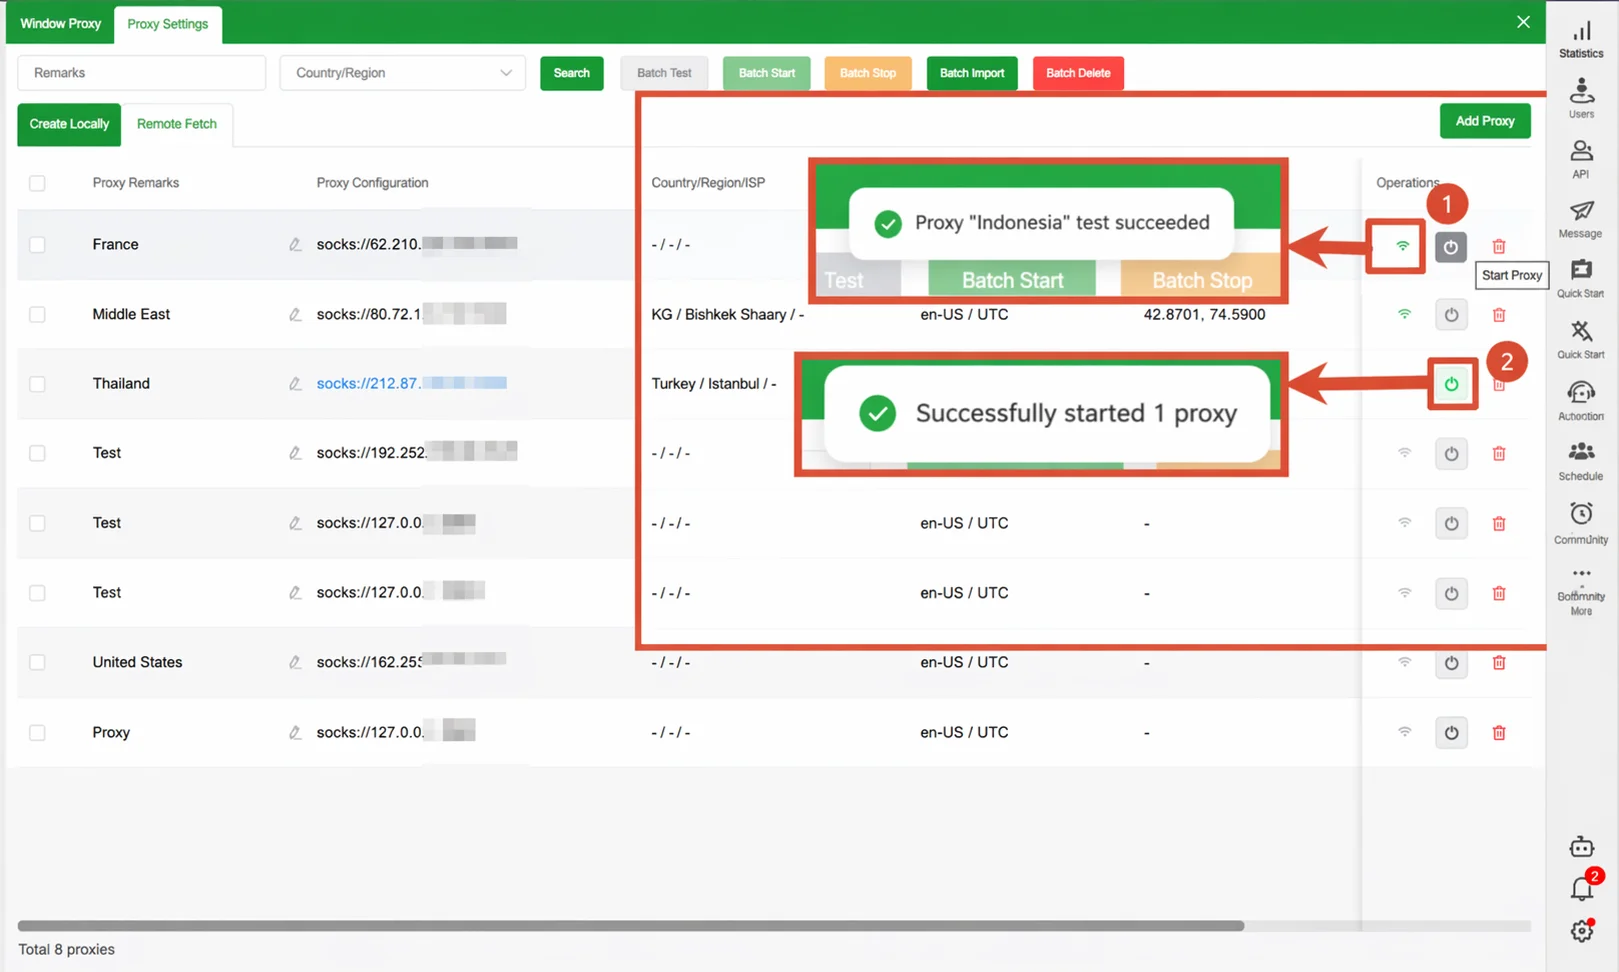
After adding proxies, immediately check their connectivity to confirm they are valid before binding them to accounts. Select the proxies you want to test in the list, click the Batch Check button, and the system automatically tests the connection status of each proxy.
After the check completes, the list shows the status of each proxy (Normal / Abnormal). For abnormal proxies, contact your provider to verify whether the IP information is valid, or replace it with a new proxy.
Step 5: Bind a proxy to an account window
Once proxy resources are ready, switch to the Window Proxy tab. This lists all current WhatsApp account windows and their current proxy bindings.
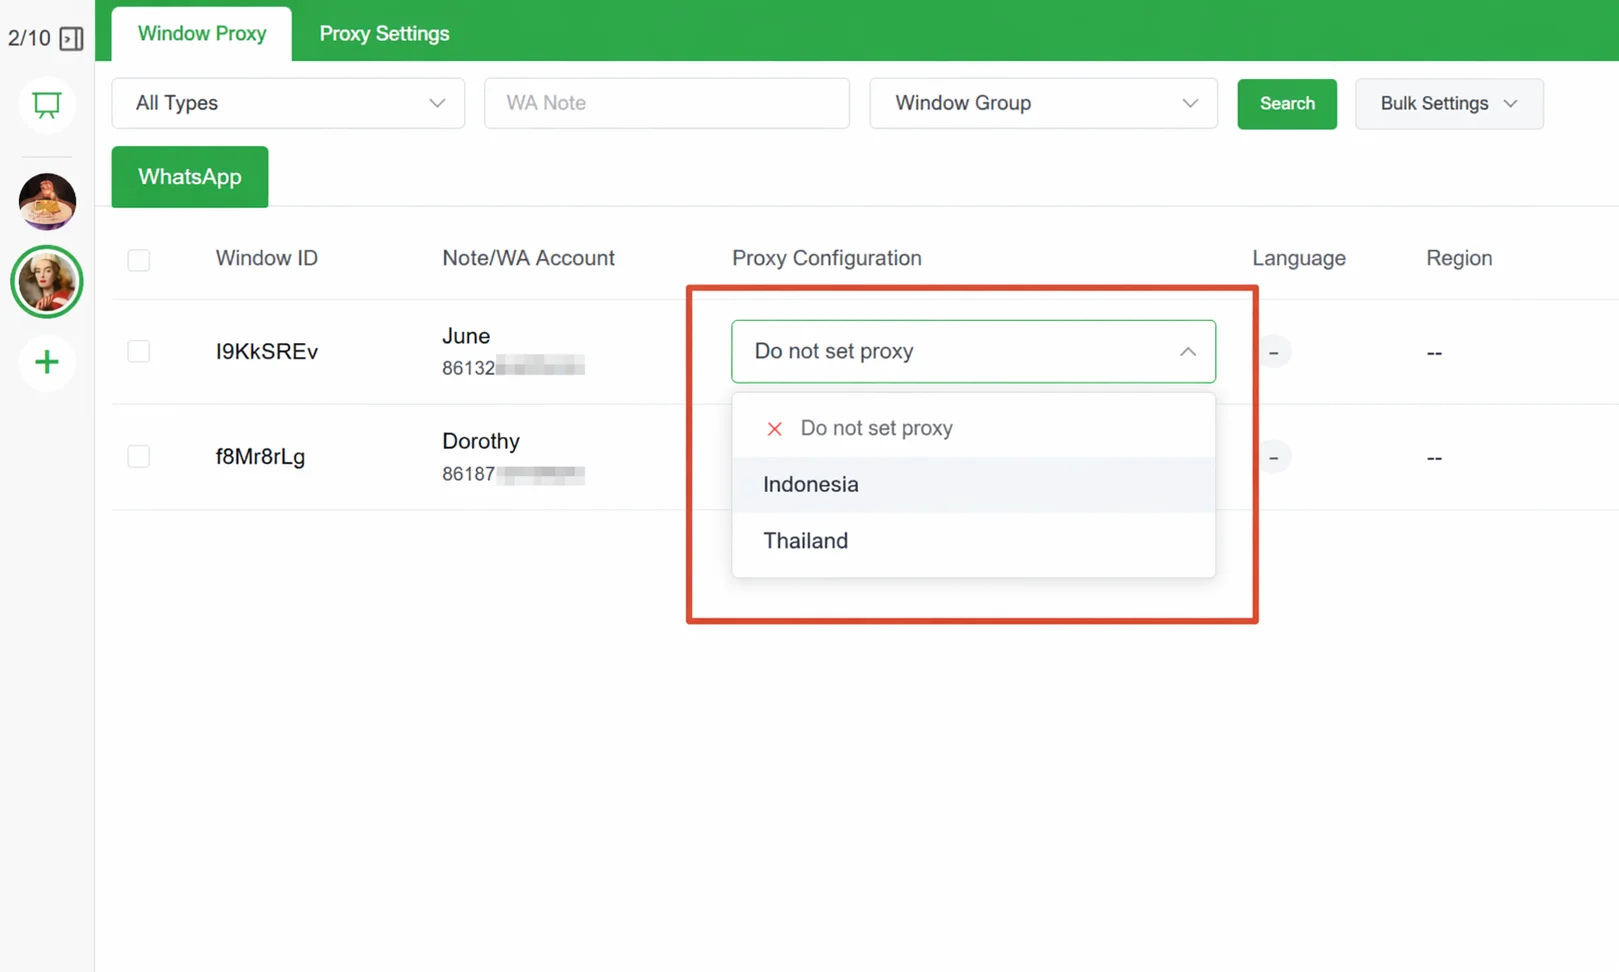
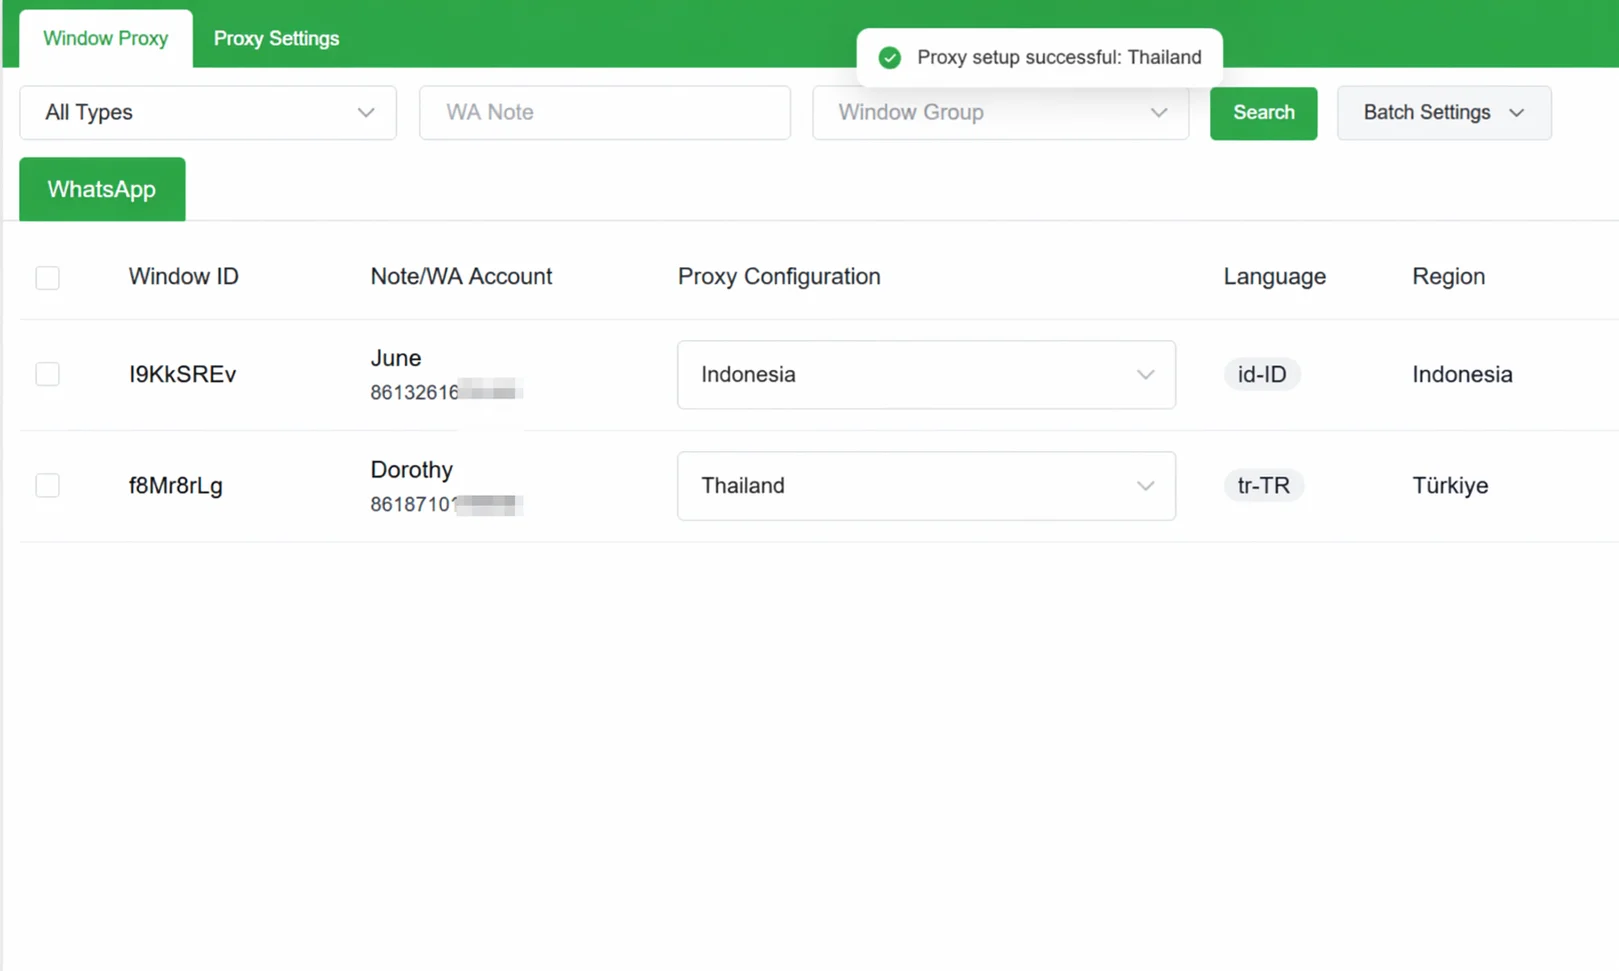
Single binding: Find the target account row, click the dropdown in the Proxy Configuration column, and select a proxy from the list. It takes effect immediately.
Batch binding: Select multiple account windows, click the Batch Set button in the top right, and assign the same proxy to all selected windows at once.
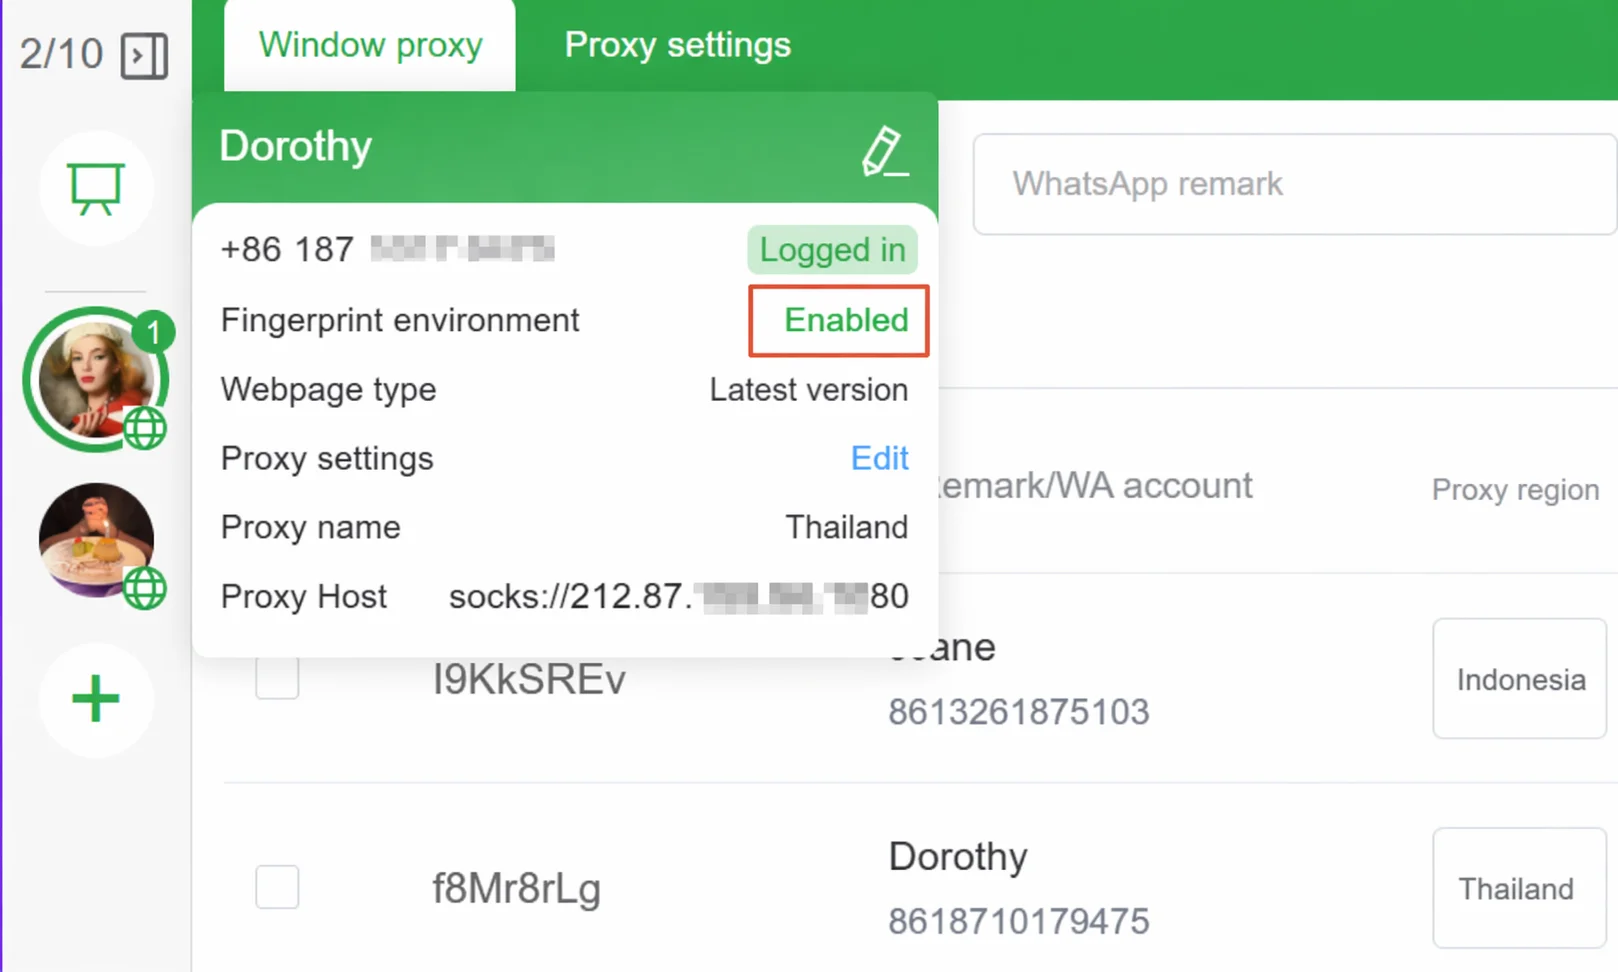
After successful Proxy configuration, the status list in the left account panel displays the latest proxy status synchronously, making it easy to quickly check the account-IP mapping.
Important Notes
- Keep the proxy region consistent with the account's registration region: If the account was registered with an Indian phone number, choose an Indian IP for the proxy. A large regional discrepancy may trigger WhatsApp's Risk Control for login from an unusual location.
- Replace invalid proxies promptly: Proxy IPs may expire or get blocked over time. We recommend running Batch Check regularly. Immediately replace any proxy found to be abnormal to avoid account disconnections or bans caused by network issues.
- Do not switch proxies frequently: Changing a proxy IP multiple times within a short period for the same account may be flagged as abnormal behavior by WhatsApp, increasing the risk of a ban. After switching proxies, let the account sit idle for a while before resuming normal operations.
FAQ
Q: Can my account work normally without a proxy? A: Yes. Your account uses your local network directly when no proxy is configured. However, if you operate multiple accounts on the same device, we strongly recommend configuring a unique proxy for each account to reduce the risk of linked bans.
Q: The proxy check shows "Abnormal" — what causes this? A: There are three common causes: (1) The proxy IP or port was entered incorrectly — verify the details from your provider. (2) The proxy has expired or been deactivated by the provider — contact your provider for a replacement. (3) Your local network cannot connect to the proxy server — check your firewall or network settings.
Q: How long does it take for a proxy to take effect after binding? A: It takes effect immediately after binding; no need to restart the account window. Check the Region and Coordinates fields for that window in the Window Proxy list to confirm the proxy has been correctly applied.